Sep 01

Friday Post: Arduino Keyboard Joystick

Hey all,

It’s been a long week, and I am really glad I have a long weekend to sleep in.

When the Arduino Leonardo was announced I was really excited to see it have built in USB HID support and could act as a keyboard, mouse, or joystick.  I was even more excited to find out that my year old Teensy++ (Arduino compatible board) was based on the same chipset that the Leonardo now uses, and is able to act as a keyboard as well!

This is a new feature that was introduced in the Arduino 1.0 IDE.  You can now send keyboard presses with this simple line of code: Keyboard.write(‘a’);  If I wanted the Up joystick to be the up arrow on the keyboard, I would just use: Keyboard.write(0x0E); .

.

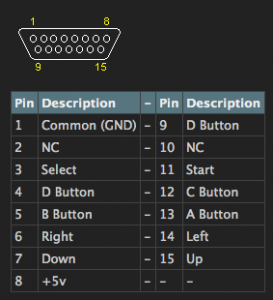
My goal is to use my Neo Geo AES controllers as an input for MAME.  The Neo Geo pads don’t have any control boards built into the unit.  The console itself interprets each pin individually, just like an actual arcade board.  The pad uses a standard midi gameport (DA-15) connector, with each pin representing one button.

My idea is to make a Neo Geo pad to usb adapter using the Teensy++ as go-between.  The Neo Geo pins will be wired up to the digital pins on the Teensy, and the Teensy Arduino sketch will interpret each button press as a keyboard press.

I’m looking forward to working on this project.  I hope everyone has a great weekend and a restful Labor Day.

Aug 12

Descent Tutorial

Today I present a tutorial on compiling Descent for your Raspberry Pi running Raspbian.  At the end of this tutorial you should have binaries ready to go and and a playable version of the game Descent.  If you don’t want to wait for the compile, I have the binaries ready for you.  Just skip to the end.

  1. Install the required dependancies
    1. sudo apt-get install libsdl1.2debian libsdl-mixer1.2 libsdl-mixer1.2-dev libsdl-image1.2 libsdl-image1.2-dev libsdl-ttf2.0-0 libsdl-ttf2.0-dev libsdl-net1.2 libsdl-net1.2-dev gcc-4.7 scons libphysfs-dev
  2. cd ~/
  3. mkdir descent
  4. cd descent
  5. Download the needed source code:
    1. wget http://sourceforge.net/projects/dxx-rebirth/files/dxx-rebirth/0.57.3/d1x-rebirth_v0.57.3-src.tar.gz
    2. wget http://sourceforge.net/projects/dxx-rebirth/files/dxx-rebirth/0.57.3/d2x-rebirth_v0.57.3-src.tar.gz
  6. Download the needed patches:
    1. wget http://www-user.tu-chemnitz.de/~heinm/tmp/d1x-rebirth-rpi.diff.gz
    2. wget http://www-user.tu-chemnitz.de/~heinm/tmp/d2x-rebirth-rpi.diff.gz
  7. Unzip the source files and the patches:
    1. tar xvfz d2x-rebirth_v0.57.3-src.tar.gz
    2. tar xvfz d1x-rebirth_v0.57.3-src.tar.gz
    3. gunzip d1x-rebirth-rpi.diff.gz
    4. gunzip d2x-rebirth-rpi.diff.gz
  8. You now have to patch the source code with the diff files.
    1. cd into the source code directories.
      1. Descent 1
        1. cd ~/descent/d1x-rebirth_v0.57.3-src/
        2. patch -p1 < ../d1x-rebirth-rpi.diff
      2. Descent 2
        1. cd ~/descent/d2x-rebirth_v0.57.3-src/
        2. patch -p1 < ../d2x-rebirth-rpi.diff
  9. We are now ready to compile!
  10. On the command line enter these two commands:
    1. export CC=gcc-4.7
    2. export CXX=g++-4.7
  11. Descent 1
    1. cd ~/descent/d1x-rebirth_v0.57.3-src/
    2. scons raspberrypi=1
      1. Wait around 30 – 40 minutes.
      2. If there are no errors you should now have a d1x-rebirth executable file in your directory!
  12. Descent 2
    1. cd ~/descent/d2x-rebirth_v0.57.3-src/
    2. scons raspberrypi=1
      1. Wait around 30 – 40 minutes.
      2. If there are no errors you should now have a d2x-rebirth executable file in your directory!
  13. You now need the data files that holds the actual game levels, sounds, artwork, etc.  These are in .hog, .pig, and .ham (descent 2 only) files.  You can get the game content from dxx-rebirth, the creators of this port.  They also have links to the shareware files:
    1. http://www.dxx-rebirth.com/game-content/
    2. http://www.dxx-rebirth.com/download/dxx/content/descent-pc-shareware.zip
    3. http://www.dxx-rebirth.com/download/dxx/content/descent2-pc-demo.zip
  14. Unzip those files by running unzip filename
  15. copy descent.hog and descent.pig to ~/descent/d1x-rebirth_v0.57.3-src/
  16. copy D2DEMO.HAM, D2DEMO.HOG and D2DEMO.PIG  to ~/descent/d2x-rebirth_v0.57.3-src/
  17. You are now ready to play!
    1. Descent 1
      1. cd ~/descent/d1x-rebirth_v0.57.3-src/
      2. ./d1x-rebirth -hogdir . (yes, thats a period at the end that must be there)
    2. Descent 2
      1. cd ~/descent/d2x-rebirth_v0.57.3-src/
      2. ./d2x-rebirth -hogdir .
  18. ENJOY!!


I realize these are a lot of instructions, but I wanted to make them as verbose as possible.
Below are the precompiled binaries with shareware data files already copied over.

Descent 1 Binaries | Descent 2 Binaries

Please let me know if any of this doesn’t work for you.  I wrote down every single step I did when I compiled it, but I’m afraid I may have missed something.  Let me know and I’ll correct it!

-Shea

Aug 10

Friday Post: Descent and photography

Hey all,

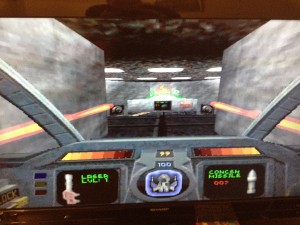
Another Friday post here.  A couple of days ago Derhass made a post about getting Descent 1 and 2 ported to the Raspberry Pi with OpenGL ES.  Descent was an amazing game released back in the early 1990’s.  It had true 6 range freedom of movement in a spaceship with 3D modeling.   An amazing game at the time, and one that I could NEVER beat.  I’m in the middle of writing a tutorial on how to patch and compile the game, as well as hosting the binaries themselves.

Today on the Raspberry Pi frontpage is a really cool piece on time lapse photography titled “Painting with light (and a Raspberry Pi)”.  The images are really fantastic:

Time lapse photography

Hope everyone has a good weekend.  I’ll be writing the tutorial up this weekend and should have it posted soon.  Thanks for the view!

-Shea


Aug 08

Raspberry Pi – Quake 2

Hey All,

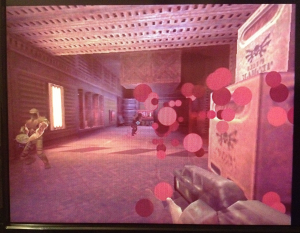
Reefab has spent an amazing amount of time getting Quake 2 to run on the Raspberry Pi.  The port is based off of YQuake2 and has been changed to use OpenGL ES.  It runs quite well on the Raspberry Pi, there is some slowdown but it’s still very playable.

You can download and compile it yourself from his Github repository (which also has really well done compiling instructions), or you can download the precompiled binaries from my site.

  1. Download Binaries (quake2Bin.zip)
  2. unzip quake2Bin.zip
  3. cd quake2Bin
  4. ./quake2
  5. Frag away!

Let me know if you run into any issues with these binaries!

Aug 08

Youtube-Viewer

Hey all,

As you saw in my previous post / video, I was running Youtube videos in fullscreen on my little display.  I was using an application (really just a 2000+ line perl script) that does this for me.  The program is called youtube-viewer (github)

Gcala posted a nice guide on how to set it up and has given me permission to also repost it here.  I’m making some modifications as I had to do a couple changes, but it works.

  1. sudo apt-get install gcc-4.7
  2. export CC=gcc-4.7
  3. export CXX=g++-4.7
  4. sudo apt-get install libwww-perl
  5. sudo cpan -i XML::Fast
  6. sudo wget https://github.com/downloads/ssilverm/youtube-viewer/youtube-viewer -O /usr/bin/youtube-viewer
  7. sudo chmod +x /usr/bin/youtube-viewer

Now just type youtube-viewer on the command line and you are good to go 🙂

List of Commands
all               : play all the results in order
next              : go to the next page (same as <ENTER>)
back              : return to the previous page
login             : will prompt you for login
logout            : will delete the authentication key
[integer]         : play the corresponding video
i, info [i]       : show more informations about one video
c, comments [i]   : show video comments (e.g.: c 19)
r, related [i]    : show related videos (e.g.: r 6)
v, videos [i]     : show author's latest videos
p, playlists [i]  : show author's latest playlists
subscribe [i]     : subscribe to author's channel
like, dislike [i] : like or dislike a video
fav, favorite [i] : favorite a video (e.g.: fav 3)
[keywords]        : search for youtube videos
3-8, 3..8         : same as 3 4 5 6 7 8
8 2 12 4 6 5 1    : play the videos in your order
-argv -argv2=v    : set some arguments (e.g.: -u=google)
e, edit-config    : edit and apply the configuration
load-config       : (re)load the configuration file
/my?[regex]*$/    : play videos matched by a regex (/i)
reset, reload     : restart the application
q, quit, exit     : close the application

Let me know if you have any issues or questions!

-Shea

Aug 03

Friday Post: Woo! Long week…

Hey all,

This has been an interesting long week.  I’m really happy with the feedback I’ve recieved regarding the Raspbian binaries I released.  I got linked to by Adafruit which is awesome!  I purchased one of thier little 2.0″ LCD TVs.  Still waiting for it to arrive, but I plan to do some fun things with that small screen and the Raspberry Pi.  Bensoutlet.com has on sale the Motorola Lapdock for $59.99 which is a really good price.  Theres a 14 page forum post about how people are using it to make Raspberry Pi laptops.

My next goal is to write up some tips and tricks for the emulators that my commentors have posted, and still working on getting Love2D to work.

Hope everyone has a good weekend!

-Shea

Jul 07

Development Words of Wisdom

I found this quote from Evil Brain Jono’s blog post “Everybody Hates Firefox Updates”:

Software companies would do well to learn this lesson: anything with the phrase “users love our product” in it isn’t a strategy, it’s wishful thinking. Your users do not “love” your software. Your users are temporarily tolerating your software because it’s the least horrible option they have — for now — to meet some need. Developers have an emotional connection to the project; users don’t.

It’s 100% true.  I’m going to try to remember this from now on.  I suggest reading the whole blog post from the link above.  It’s a very good post.

-Shea

Jun 22

Installing Django and MySQL on Mac OS X Lion

In the past 6 months I’ve had to setup Django and MySQL 4 times on our various Mac hardware at work.  I figured since I’ve seen to have it down pat now I should document it somewhere 🙂

Python should already be installed.

sudo easy_install pip

download MySQL dmg from mysql.com.  This is the version I’m using.

Mac OS X ver. 10.6 (x86, 64-bit), DMG Archive 5.5.25 111.9M
(mysql-5.5.25-osx10.6-x86_64.dmg) MD5: 081d3345daaae6f5f36a9f245855798b

sudo easy_install django

nano ~/.profile
paste this in:
export PATH=/usr/local/mysql/bin:$PATH
export DYLD_LIBRARY_PATH=”$DYLD_LIBRARY_PATH:/usr/local/mysql/lib/”

Download and install https://github.com/kennethreitz/osx-gcc-installer

sudo easy_install MySQL-python

You are ready to go 🙂


Jun 03

Raspberry Pi!

So, I recently got my Raspberry Pi and have been having a lot of fun with it.

Programming in Python on it, running Quake 3 Arena, trying to compile different apps with various states of success.  Using Google Chromium on it.

The experience has been amazing.  This $35 machine has allowed me to play games, browse the modern internet, program, all using hardware I have laying around.

The Raspberry Pi outputs to both HDMI and RCA, so I’ve been using an old studio monitor at work as a display and it runs great.  At home I connect it via HDMI and it looks beautiful.

I am in the middle of uploading an iso/image file of my SD card so if anyone wants to try out these features without having to go through the setup, they can.

I plan on also updating with some tips and tricks.

I want to thank the blog http://myraspberrypiexperience.blogspot.co.uk/ – They have provided some wonderful guides so far.

One of my goals is to get the LOVE2D framework compiled.  At the moment, it won’t work because of the non existant OpenGL drivers, but nLove is available, and was made for ARM based platforms.  I am having difficulty getting it compiled, but I’m going to keep trying.

First tip to remind myself:

sudo mv /boot/boot_enable_ssh.rc /boot/boot.rc

This will enable ssh on the device at bootup.  If you just want to enable ssh once, then at the command prompt enter:

sudo /etc/init.d/ssh start

This assumes you are running the Debian Squeeze Raspberry Pi image.

Mar 27

PhoneGap 1.5.0 and iOS 5.1

Hey All,

Just posting here so I remember some fixes I had to do with the new release of PhoneGap 1.5 (also known as Cordova).

When you initially run your new xCode product, you will get a ton of “semantic” issues.  The fix is to go to Build Settings -> Objective-C  Automatic Reference Counting -> “NO”

I found this clarification from a comment posted by Alejandro Orduz at http://phonegap.com/2012/03/06/phonegap-1-5-released/ 

“ok, i manage to make it work, Cordova, under Xcode 4.3.1…. regarding the www stuff…

First of all, getting into this painful process(more of all because of my lack of knowledge of Xcode), i wen to the process to upgrade my iPhone to the latest iOS 5.1, then had to upgrade Xcode to 4.3.1 to support testing in this device, but also did an upgrade to the latest lion 10.7.3…. so it was a boring weekend of upgrading….

The first time you run a new phone gap project under Cordova, is not like old days, now when you run you get a scary 9 errors warnings about a Semantic Issue in some, NSAutoreleasePool well, for some of us, that is like speaking chinease… but it can be solved very easy… the new Xcode has some Automatic Reference Counting ON by default, so you just go to the project Build Settings, find Objective-C  Automatic Reference Counting and change it to “NO”, after that everything goes to normal…. then it can build, add the www, you get the normal iPhone simulator error, and then, like before, had to drag and drop the www folder into the project root….

Changes like this are very scary for people like me, that found phonegap an amazing tool to build mobile apps with our web development knowledge…. :-{  ”

Also! I finally got the camera example working.  I was receiving a weird “wait_fences: failed to receive reply: 10004003” when I used the Camera example code verbatim.  It would work, but I would only recieve a small blue box on my iPhone.

The issue is that the code on line 40:

smallImage.src = “data:image/jpeg;base64,” + imageData;

is wrong.  PhoneGap 1.5 / iOS 5 stores the taken photo in a temporary directory, so you dont get the base64 data anymore, you have the actual URI for the photo in imageData.  All you need to do is change line 40 to be:

smallImage.src =  imageData;

and it will work.


I hope this helps out some people.  It’s working for me, YMMV.

-Shea