Dec 14

Friday Post: PiMAME Image and other neat things

Hey All,

Hope you all like this:

PiMAME

Download Here

This is a fully configured Raspberry Pi image that auto boots into AdvanceMENU and runs your MAME games for you.  It includes a copy of a Free MAME ROM so you can see it working right from the start.  SSH is already enabled, memory split is setup, and everything is updated.

Once you have it flashed to your SD Card, I recommend running “sudo raspi-config” and expanding the file system, otherwise you will only have a few megs of space left to use.

Please let me know if you have any questions, comments, or suggestions!

Raspberry Pi Radio

http://www.icrobotics.co.uk/wiki/index.php/Turning_the_Raspberry_Pi_Into_an_FM_Transmitter

With one wire and a simple program, you can turn your Raspberry Pi into an FM Transmitter that plays on FM 100.0MHz.
 

Nov 01

Better AdvanceMAME debs with Sound!

Hey All,

I have an updated set of AdvanceMAME debs.  This time there is sound, and a lot of the stupid tricks I had to do to compile have been resolved.  It ended up being a libsdl issue and an older version of GCC.

Please uninstall the older .deb by entering this command:

You should now be set to run AdvanceMAME with sound!

If you want to compile AdvanceMAME yourself, make sure you install libsdl1.2-dev and gcc-4.7. After that make sure to do export CC=gcc-4.7 and export CXX=g++-4.7 on the command line.  Then type ./configure, then make.


Oct 29

AdvanceMAME .deb

UPDATE:  Debs with Sound now available here

Hey All,

It’s been a long time coming.  Between work, prototyping, other complications I present the AdvanceMAME  Debian package.

I was able to get past the issue with AdvanceMAME compiling on Raspbian. It’s the sh2 processor for the Saturn, so I had to disable that. After that, it compiles.

I have the src code up on github if anyone wants to check out the changes I had to make.

Github: https://github.com/ssilverm/AdvanceMAME_RaspberryPi
Debs: http://sheasilverman.com/rpi/raspbian/debs/advancemame_0.106.1-1_armhf.deb http://sheasilverman.com/rpi/raspbian/debs/advancemame-raspberrypi_1-1_armhf.deb (with sound)

To install:

  1. sudo dpkg -i advancemame_0.106.1-1_armhf.deb
  2. Once it’s installed, just type advmame and it will create your configuration file.
  3. Roms go in ~/.advance/rom/
  4. Edit your advmame.rc for your display:
    1. For HDMI try:
      1. device_video_clock 5 – 50 / 15.62 / 50 ; 5 – 50 / 15.73 / 60
    2. For NTSC TVs try:
      1. device_video_clock 5 – 50 / 15.73 / 60
  5. to run a game: advmame gamename (ie advmame sf2)
  6. ENJOY!!!


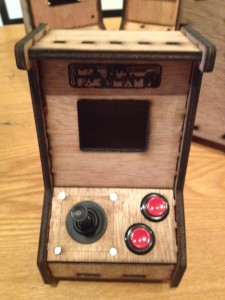
Also, another goodie… My deskcade project is coming along incredibly well! I just got in these 18mm Sanwa buttons. They are awesome.

I hope everyone enjoys. Let me know if you have any questions, comments, or suggestions!

-Shea

Oct 26

Friday Post: One step forward, two steps back

Hey all,

So I got MAME compiled.  The performance took a HUGE nosedive.  Whereas before SF2 was playing flawlessly, it now looks like a slideshow.  I’m going to work on it some more.  Sorry for the huge delay in these Debs.  I’m getting much closer!

I found some 18mm buttons for my DeskCade project.  I’m really excited with how that project is going.  Can’t wait for the buttons to arrive.

Time to let a compile run overnight again!

-Shea

Oct 25

AdvanceMAME compilations issues on Raspbian [SOLVED]

Hey all,

If anyone is having compilation issues of AdvanceMAME on Raspbian,  here is the relativly simple fix:

Change the line:

CONF_CFLAGS_OPT= -O2 -fomit-frame-pointer -fno-merge-constants -Wall -Wno-sign-compare -Wno-unused

to

CONF_CFLAGS_OPT= -fomit-frame-pointer -fno-merge-constants -Wall -Wno-sign-compare -Wno-unused

in your Makefile.

.Debs to be released shortly now that this is sorted!

Sep 01

Friday Post: Arduino Keyboard Joystick

Hey all,

It’s been a long week, and I am really glad I have a long weekend to sleep in.

When the Arduino Leonardo was announced I was really excited to see it have built in USB HID support and could act as a keyboard, mouse, or joystick.  I was even more excited to find out that my year old Teensy++ (Arduino compatible board) was based on the same chipset that the Leonardo now uses, and is able to act as a keyboard as well!

This is a new feature that was introduced in the Arduino 1.0 IDE.  You can now send keyboard presses with this simple line of code: Keyboard.write(‘a’);  If I wanted the Up joystick to be the up arrow on the keyboard, I would just use: Keyboard.write(0x0E); .

.

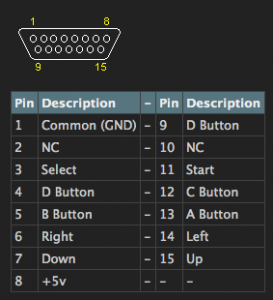
My goal is to use my Neo Geo AES controllers as an input for MAME.  The Neo Geo pads don’t have any control boards built into the unit.  The console itself interprets each pin individually, just like an actual arcade board.  The pad uses a standard midi gameport (DA-15) connector, with each pin representing one button.

My idea is to make a Neo Geo pad to usb adapter using the Teensy++ as go-between.  The Neo Geo pins will be wired up to the digital pins on the Teensy, and the Teensy Arduino sketch will interpret each button press as a keyboard press.

I’m looking forward to working on this project.  I hope everyone has a great weekend and a restful Labor Day.

Jul 31

Raspbian on Raspberry Pi – MAME, MESS, Quake3, NeoGeo, and Cave Story Binaries

Initial impressions with Raspbian.  Everything seems to be either playable or faster than before.

  • MESS is noticably faster.
  • MAME was a LITTLE faster (it all depends on the game).
  • Gngeo (Neo Geo) was still playing at full speed.
  • Cave Story works fine as long as music is disabled.
  • Quake 3 Arena plays but sometimes crashes (as seen in the video)

Binaries are available below:

Let me know if something doesn’t work or if you need help.  Hope everyone likes these!  Thanks to those who helped put some of these binaries together!

Tutorials Available Here

Jul 27

Friday Post: Raspbian

I once read some very good advice about blogging, and that is to have a schedule and keep to it.  This blog has been my brain dump, I post things when I think about them.  I don’t really preplan for my posts.  Something gets completed, it’s cool, I write it down.  I’ve slowly gained a small community of some really cool people here, and I think it’s only fair to everyone that I at least post once a week regardless.

With that said, I’m going to post something every Friday.  I hope you enjoy.  Now on to the content!

I’ve been playing around a bit with the Raspbian release.  I’ve started to recompile all the binaries I released, and will be posting them online once they are to my liking.  I’ve found some hiccups along the way, but I seem to be working through them.

My goals:

  • I really want to get Cave Story working without the lag every 5 seconds.
  • Get Quake3 running again (seems a commenter has been working on that!)
  • Recompile AdvanceMESS and AdvanceMAME
  • Recompile Gngeo and get full screen working right.
  • Get a frontend running that will work with these emulators
  • Get Love2D running.

I got my second Raspberry Pi in the mail yesterday.  This one comes from RS.  The big differences I’ve seen so far in the board itself is that the silkscreening is a little different, and the company that supplies the memory is different.  In my Element14 board, the memory is Samsung.  The RS board uses Hynix memory.

I’ll post some pictures later.

-Shea

Jul 01

Raspberry Pi and MESS – Multi Emulator Super System – NES, GameGear, Genesis

UPDATE: New Raspbian Binaries Available

Hey All!

Today I present the binaries for AdvanceMESS.  The Multi Emulator Super System.  MESS can emulate somewhere around 250 different home consoles and computers.  It’s not perfect in any sense, but it works for most consoles.

I have currently tested:

  • NES (some games are slow, but it works).
  • GameGear (works)
  • Genesis (slow but works)
  • SNES (couldn’t get it to work…yet)
Instructions:
  1. Download MESS Binaries.
  2. Unzip MESS to the ~/MESS directory.
  3. chmod 777 /dev/fb0
  4. Put your console bios’s into mess/share/advance/rom/
  5. Put your console games into mess/share/advance/image/<console>/ (ie mess/share/advance/image/nes/
  6. CD into mess/bin/
  7. Run advmess with ./advmess
    1. The first time it’s run it will generate a set of folders and files into ~/.advance
  8. edit your ~/.advance/advmess.rc to include the proper display configuration
    1. For HDMI try:
      1. device_video_clock 5 – 50 / 15.62 / 50 ; 5 – 50 / 15.73 / 60
    2. For NTSC TVs try:
      1. device_video_clock 5 – 50 / 15.73 / 60
  9. While still in the mess/bin directory, type ./advmess <console> -cart <filename>
    1. ./advmess nes -cart file.nes
  10. ENJOY!!!

This is one of the weirder setups I’ve tested, but once setup, it works.  If you have any issues, let me know and I will try to help you.

-Shea

P.S. I will NOT help you find console bios or roms.  Please don’t ask.

Official MESS Site

Jun 13

Raspberry Pi and MAME Part 2

THIS IS AN OLD POST!  Please go to the latest update here!

Hello everyone from raspberrypi.org!  Thanks for visiting, more updated tutorials and binaries are available by clicking the menu item Raspberry Pi Gaming!

UPDATE: New Raspbian Binaries Available (new binaries above)

So I’ve spent even more time playing around with my MAME compile and my Raspberry Pi.  I have a new set of downloads, once is a set of binaries so you don’t even need to do a make install.

  1. Unzip MAME directory.
  2. chmod 777 /dev/fb0
  3. Put your roms into mame/share/advance/roms/
  4. run mame/bin/advmame
    1. The first time it’s run it will generate a set of folders and files into ~/.advance
  5. edit your ~/.advance/advmame.rc to include the proper display configuration
    1. For HDMI try:
      1. device_video_clock 5 – 50 / 15.62 / 50 ; 5 – 50 / 15.73 / 60
    2. For NTSC TVs try:
      1. device_video_clock 5 – 50 / 15.73 / 60
  6. run mame/bin/advmame <gamename>
    1. cd into mame/bin/ then ./advmame gamename
  7. ENJOY!!!

Download AdvanceMAME Raspberry Pi Binaries

As an aside, I overclocked my Pi to 900Mhz, and Street Fighter 2 is slow, but playable 😀

edit: fixed an error in the path.  Also added a different way to run advmame (the way I run it).  Just cd into the bin directory then ./advmame gamename.