Sep 12

Good News Everyone!

Good News Everyone!  I was able to recover my corrupted filesystem.  I also completed a large chunk of a major project I’m working on at the University.  This one piece of code has been bugging me for a couple of days, and I finally solved it today, so I feel a lot better.  I’m exhausted but hopefully tomorrow I can do some more emulation testing.

I have been testing PCSX_ReARMed for the Pi and it’s working really well.  NeoPop-SDL (Neo Geo Pocket Color) emulator is working as well, though it doesn’t fullscreen properly.  Mednafen 0.8 (a multi console emulator) is already in the Raspbian Repos.  Mednafen 0.9 has trouble compiling out of the box but I was able to get past the issues and it’s working.  I’ll be posting binaries this week as well as some tutorials.

Have a great night!

Sep 07

Raspberry Pi SD Card Corruption

Hey All,

So this week started off cool then took a turn for suckage.  I’ve been working on getting two more emulators working.  One is a Neo Geo Pocket Color emulator, and it works, but has some minor issues.  The other is another mass emulator like MESS.  The older version compiles, but the latest one errors out.

The reason I am not posting binaries at the moment is because my SD card’s filesystem got corrupted during a test I was doing, and won’t boot.  I’ve made a bit for bit backup of the card using DD, and I’m going to try and retrieve as much data from it as possible.  Luckily I have other SD cards to use.

I was hoping to have the binaries for NeoPop available tonight but I have to recompile them on the new SD card.  If you want you can click the link above and download the source and compile it yourself.

The other emulator I’ve been working on compiling is called Mednafen.  The old version (0.8) is available in Raspbian repos, so just do sudo apt-get install mednafen and you should be good to go.   Make sure you run it once, then edit the ./mednafen/mednafen.rc file.  There is a part that says video and it tries to use opengl, set it to SDL and you should be good to go.

Have a great weekend everyone!

Sep 01

Friday Post: Arduino Keyboard Joystick

Hey all,

It’s been a long week, and I am really glad I have a long weekend to sleep in.

When the Arduino Leonardo was announced I was really excited to see it have built in USB HID support and could act as a keyboard, mouse, or joystick.  I was even more excited to find out that my year old Teensy++ (Arduino compatible board) was based on the same chipset that the Leonardo now uses, and is able to act as a keyboard as well!

This is a new feature that was introduced in the Arduino 1.0 IDE.  You can now send keyboard presses with this simple line of code: Keyboard.write(‘a’);  If I wanted the Up joystick to be the up arrow on the keyboard, I would just use: Keyboard.write(0x0E); .

.

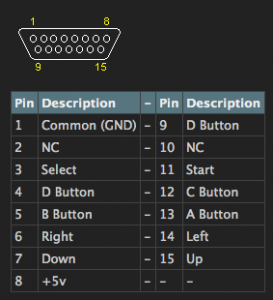
My goal is to use my Neo Geo AES controllers as an input for MAME.  The Neo Geo pads don’t have any control boards built into the unit.  The console itself interprets each pin individually, just like an actual arcade board.  The pad uses a standard midi gameport (DA-15) connector, with each pin representing one button.

My idea is to make a Neo Geo pad to usb adapter using the Teensy++ as go-between.  The Neo Geo pins will be wired up to the digital pins on the Teensy, and the Teensy Arduino sketch will interpret each button press as a keyboard press.

I’m looking forward to working on this project.  I hope everyone has a great weekend and a restful Labor Day.

Aug 24

Friday Post: Playstation Emulation on the Raspberry Pi!

EDIT: UPDATED BINARIES HERE – FULL SPEED ACHIEVED!

Hey All!

Happy Friday!  This week brings some really cool things for the Raspberry Pi.  First up, we have a Playstation Emulator that works under X in on the Pi.  It’s called PCSX, it’s OpenGL ES enabled, and while it’s not runnign at full speed, it’s a really cool display of the technology that can be powered by the Pi.  Binaries and Instructions below.

Download PCSX Binaries

To use this you will need CD ISO’s of your backed up PSX games stored on the SD card.

  1. Make sure you in a windowed environment.  If you are just on the command line, use the command startx.
  2. Double click on LXTerminal on the desktop or open it from the application menu at the bottom left.
  3. From the LXTerminal, type cd ~/ to get to your home directory.
  4. wget http://sheasilverman.com/rpi/raspbian/pcsx.zip
  5. unzip pcsx.zip
  6. cd pcsx
  7. chmod +x pcsx
  8. ./pcsx
  9. Use up and down to navigate the menus.
  10. Select Load, then navigate the directory where you saved the CD image
  11. Select your game then press enter
  12. ENJOY!!!

This emulator is far from perfect on the Raspberry Pi.  Some games won’t work, frame rates are wild, and it can be a bit frustrating, but who cares!  It’s a freakin’ Playstation emulation on the Raspberry Pi!

Second cool thing to come out today is an announcement from the Raspberry Pi foundation.  They are now selling licenses to enable MPEG-2 and VC-1 decoding, as well as H.264 encoding (free?) and CEC support!

I’m not sure how the license system works since it is somehow tied to your Pi’s serial number, but you can purchase them at the Raspberry Pi store.

Hope everyone has a great weekend!


Aug 16

Made the frontpage!

I was very excited when I found out that on Monday, I made the frontpage of the Raspberry Pi website.  A big shout out to Liz for mentioning me and linking back here.  It made my day!

I really love working on this little computer.  I’m learning so much and using skills that I took for granted.  It’s really pushing some of the boundaries I had setup against myself.  I’m glad to be getting past them.

I’m also thinking of getting one of these and building a RaspberryPi bartop machine:

Aug 12

Descent Tutorial

Today I present a tutorial on compiling Descent for your Raspberry Pi running Raspbian.  At the end of this tutorial you should have binaries ready to go and and a playable version of the game Descent.  If you don’t want to wait for the compile, I have the binaries ready for you.  Just skip to the end.

  1. Install the required dependancies
    1. sudo apt-get install libsdl1.2debian libsdl-mixer1.2 libsdl-mixer1.2-dev libsdl-image1.2 libsdl-image1.2-dev libsdl-ttf2.0-0 libsdl-ttf2.0-dev libsdl-net1.2 libsdl-net1.2-dev gcc-4.7 scons libphysfs-dev
  2. cd ~/
  3. mkdir descent
  4. cd descent
  5. Download the needed source code:
    1. wget http://sourceforge.net/projects/dxx-rebirth/files/dxx-rebirth/0.57.3/d1x-rebirth_v0.57.3-src.tar.gz
    2. wget http://sourceforge.net/projects/dxx-rebirth/files/dxx-rebirth/0.57.3/d2x-rebirth_v0.57.3-src.tar.gz
  6. Download the needed patches:
    1. wget http://www-user.tu-chemnitz.de/~heinm/tmp/d1x-rebirth-rpi.diff.gz
    2. wget http://www-user.tu-chemnitz.de/~heinm/tmp/d2x-rebirth-rpi.diff.gz
  7. Unzip the source files and the patches:
    1. tar xvfz d2x-rebirth_v0.57.3-src.tar.gz
    2. tar xvfz d1x-rebirth_v0.57.3-src.tar.gz
    3. gunzip d1x-rebirth-rpi.diff.gz
    4. gunzip d2x-rebirth-rpi.diff.gz
  8. You now have to patch the source code with the diff files.
    1. cd into the source code directories.
      1. Descent 1
        1. cd ~/descent/d1x-rebirth_v0.57.3-src/
        2. patch -p1 < ../d1x-rebirth-rpi.diff
      2. Descent 2
        1. cd ~/descent/d2x-rebirth_v0.57.3-src/
        2. patch -p1 < ../d2x-rebirth-rpi.diff
  9. We are now ready to compile!
  10. On the command line enter these two commands:
    1. export CC=gcc-4.7
    2. export CXX=g++-4.7
  11. Descent 1
    1. cd ~/descent/d1x-rebirth_v0.57.3-src/
    2. scons raspberrypi=1
      1. Wait around 30 – 40 minutes.
      2. If there are no errors you should now have a d1x-rebirth executable file in your directory!
  12. Descent 2
    1. cd ~/descent/d2x-rebirth_v0.57.3-src/
    2. scons raspberrypi=1
      1. Wait around 30 – 40 minutes.
      2. If there are no errors you should now have a d2x-rebirth executable file in your directory!
  13. You now need the data files that holds the actual game levels, sounds, artwork, etc.  These are in .hog, .pig, and .ham (descent 2 only) files.  You can get the game content from dxx-rebirth, the creators of this port.  They also have links to the shareware files:
    1. http://www.dxx-rebirth.com/game-content/
    2. http://www.dxx-rebirth.com/download/dxx/content/descent-pc-shareware.zip
    3. http://www.dxx-rebirth.com/download/dxx/content/descent2-pc-demo.zip
  14. Unzip those files by running unzip filename
  15. copy descent.hog and descent.pig to ~/descent/d1x-rebirth_v0.57.3-src/
  16. copy D2DEMO.HAM, D2DEMO.HOG and D2DEMO.PIG  to ~/descent/d2x-rebirth_v0.57.3-src/
  17. You are now ready to play!
    1. Descent 1
      1. cd ~/descent/d1x-rebirth_v0.57.3-src/
      2. ./d1x-rebirth -hogdir . (yes, thats a period at the end that must be there)
    2. Descent 2
      1. cd ~/descent/d2x-rebirth_v0.57.3-src/
      2. ./d2x-rebirth -hogdir .
  18. ENJOY!!


I realize these are a lot of instructions, but I wanted to make them as verbose as possible.
Below are the precompiled binaries with shareware data files already copied over.

Descent 1 Binaries | Descent 2 Binaries

Please let me know if any of this doesn’t work for you.  I wrote down every single step I did when I compiled it, but I’m afraid I may have missed something.  Let me know and I’ll correct it!

-Shea

Aug 10

Friday Post: Descent and photography

Hey all,

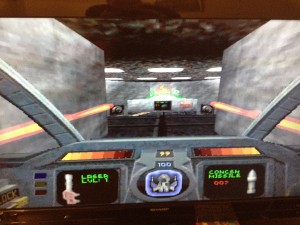
Another Friday post here.  A couple of days ago Derhass made a post about getting Descent 1 and 2 ported to the Raspberry Pi with OpenGL ES.  Descent was an amazing game released back in the early 1990’s.  It had true 6 range freedom of movement in a spaceship with 3D modeling.   An amazing game at the time, and one that I could NEVER beat.  I’m in the middle of writing a tutorial on how to patch and compile the game, as well as hosting the binaries themselves.

Today on the Raspberry Pi frontpage is a really cool piece on time lapse photography titled “Painting with light (and a Raspberry Pi)”.  The images are really fantastic:

Time lapse photography

Hope everyone has a good weekend.  I’ll be writing the tutorial up this weekend and should have it posted soon.  Thanks for the view!

-Shea


Aug 08

Raspberry Pi – Quake 2

Hey All,

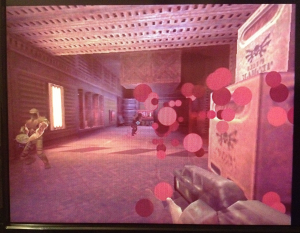
Reefab has spent an amazing amount of time getting Quake 2 to run on the Raspberry Pi.  The port is based off of YQuake2 and has been changed to use OpenGL ES.  It runs quite well on the Raspberry Pi, there is some slowdown but it’s still very playable.

You can download and compile it yourself from his Github repository (which also has really well done compiling instructions), or you can download the precompiled binaries from my site.

  1. Download Binaries (quake2Bin.zip)
  2. unzip quake2Bin.zip
  3. cd quake2Bin
  4. ./quake2
  5. Frag away!

Let me know if you run into any issues with these binaries!

Aug 08

Youtube-Viewer

Hey all,

As you saw in my previous post / video, I was running Youtube videos in fullscreen on my little display.  I was using an application (really just a 2000+ line perl script) that does this for me.  The program is called youtube-viewer (github)

Gcala posted a nice guide on how to set it up and has given me permission to also repost it here.  I’m making some modifications as I had to do a couple changes, but it works.

  1. sudo apt-get install gcc-4.7
  2. export CC=gcc-4.7
  3. export CXX=g++-4.7
  4. sudo apt-get install libwww-perl
  5. sudo cpan -i XML::Fast
  6. sudo wget https://github.com/downloads/ssilverm/youtube-viewer/youtube-viewer -O /usr/bin/youtube-viewer
  7. sudo chmod +x /usr/bin/youtube-viewer

Now just type youtube-viewer on the command line and you are good to go 🙂

List of Commands
all               : play all the results in order
next              : go to the next page (same as <ENTER>)
back              : return to the previous page
login             : will prompt you for login
logout            : will delete the authentication key
[integer]         : play the corresponding video
i, info [i]       : show more informations about one video
c, comments [i]   : show video comments (e.g.: c 19)
r, related [i]    : show related videos (e.g.: r 6)
v, videos [i]     : show author's latest videos
p, playlists [i]  : show author's latest playlists
subscribe [i]     : subscribe to author's channel
like, dislike [i] : like or dislike a video
fav, favorite [i] : favorite a video (e.g.: fav 3)
[keywords]        : search for youtube videos
3-8, 3..8         : same as 3 4 5 6 7 8
8 2 12 4 6 5 1    : play the videos in your order
-argv -argv2=v    : set some arguments (e.g.: -u=google)
e, edit-config    : edit and apply the configuration
load-config       : (re)load the configuration file
/my?[regex]*$/    : play videos matched by a regex (/i)
reset, reload     : restart the application
q, quit, exit     : close the application

Let me know if you have any issues or questions!

-Shea

Aug 06

Youtube in my Raspberry Pi? or Is that an LCD in your pocket or are you just happy to see me…

LCD Screen

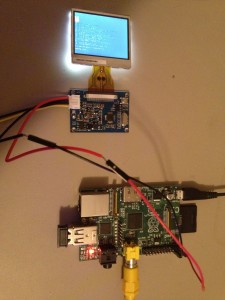
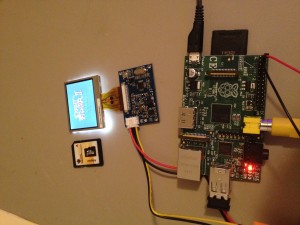
This weekend has been fun.  I got my 2.0″ LCD Display from Adafruit in!  It’s an amazing little screen.  Bright, Sharp, Colorful.  MAME, Quake, NeoGeo games all look great on it.  A concern I had was how to power the little screen.  It can take 5v – 12v, and the connector is just two bare wires for power.

After testing the screen with a regular power supply, I decided I wanted to see if I could power it via the GPIO power pins on the Raspberry Pi itself.  I was concerned about the amperage it would require, but after connecting it to pins 2 and 6 (5v and GND), and powering on the Pi, they both turned on and I was watching Raspbian bootup.

Youtube

On the Raspberry Pi Forums, gcala contributed a post with a how to on getting Youtube to play from the command line to omxplayer.

Here is a video I took after getting youtube-viewer running on my Pi:

Hope you all enjoy this!

-Shea