Jul 23

Raspberry Pi “On/Off” Cable

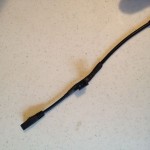
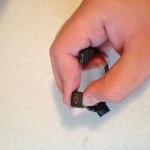
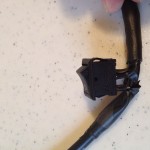
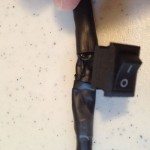
What started out as a funny thought is now reality.  I spent about an hour splicing, soldering, taping, and heat shrinking this fun little cable together.  It’s a microusb to microusb extension cable.  I split it in half, cut off the data wires, soldered the ground cable back together, wrapped electrical tape around it, then soldered each end of the Vcc wires to the power switch.  I taped them up, then tried to heat shrink as much as it as possible.

My frankenstein cable works 🙂

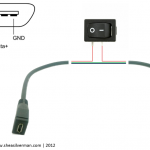
P.S.: All the items needed I got from Sparkfun.com (except the usb extension cable)

Jul 17

Cave Story (nxengine) on the Raspberry Pi

UPDATE: New Raspbian Binaries Available

I got a request today to see if I could get Cave Story working on the Raspberry Pi.  It took me about 4 hours but I’ve gotten a decent version running.  This uses the NXengine open source cave story project, along with the english translation patch the freeware data files.

Cave Story Raspberry Pi

Steps to run:

  1. Download binaries
  2. Run unzip nxengine.zip
  3. cd into nxengine
  4. run sudo chmod 777 /dev/fb0
  5. run sudo modprobe snd_bcm2835
  6. run ./nx
  7. Play Cave Story!

Let me know if you have any issues with the binaries or running the program.  I’ve only ever played about 5 minutes of Cave Story so I’m not sure how well it’s running, but it seemed to be fine to me.  Looking forward to the feedback.

-Shea

Link to source code: https://github.com/suapapa/NXEngine

Jul 07

Development Words of Wisdom

I found this quote from Evil Brain Jono’s blog post “Everybody Hates Firefox Updates”:

Software companies would do well to learn this lesson: anything with the phrase “users love our product” in it isn’t a strategy, it’s wishful thinking. Your users do not “love” your software. Your users are temporarily tolerating your software because it’s the least horrible option they have — for now — to meet some need. Developers have an emotional connection to the project; users don’t.

It’s 100% true.  I’m going to try to remember this from now on.  I suggest reading the whole blog post from the link above.  It’s a very good post.

-Shea

Jul 01

Raspberry Pi and MESS – Multi Emulator Super System – NES, GameGear, Genesis

UPDATE: New Raspbian Binaries Available

Hey All!

Today I present the binaries for AdvanceMESS.  The Multi Emulator Super System.  MESS can emulate somewhere around 250 different home consoles and computers.  It’s not perfect in any sense, but it works for most consoles.

I have currently tested:

  • NES (some games are slow, but it works).
  • GameGear (works)
  • Genesis (slow but works)
  • SNES (couldn’t get it to work…yet)
Instructions:
  1. Download MESS Binaries.
  2. Unzip MESS to the ~/MESS directory.
  3. chmod 777 /dev/fb0
  4. Put your console bios’s into mess/share/advance/rom/
  5. Put your console games into mess/share/advance/image/<console>/ (ie mess/share/advance/image/nes/
  6. CD into mess/bin/
  7. Run advmess with ./advmess
    1. The first time it’s run it will generate a set of folders and files into ~/.advance
  8. edit your ~/.advance/advmess.rc to include the proper display configuration
    1. For HDMI try:
      1. device_video_clock 5 – 50 / 15.62 / 50 ; 5 – 50 / 15.73 / 60
    2. For NTSC TVs try:
      1. device_video_clock 5 – 50 / 15.73 / 60
  9. While still in the mess/bin directory, type ./advmess <console> -cart <filename>
    1. ./advmess nes -cart file.nes
  10. ENJOY!!!

This is one of the weirder setups I’ve tested, but once setup, it works.  If you have any issues, let me know and I will try to help you.

-Shea

P.S. I will NOT help you find console bios or roms.  Please don’t ask.

Official MESS Site

Jun 29

Quake 3 Arena on the Raspberry Pi

UPDATE: New Raspbian Binaries Available

Hey All,

Quake 3 Arena has been available on the Pi for a while now, but it seems the site hosting the files have gone down for the time being.

I’m going to host them here for now.

Quake 3 for Raspberry Pi  

Quake 3 Demo PAKs

  1. It’s a really easy install.  Unzip Quake3.zip so you have /home/pi/quake3/.
  2. Unzip the demo paks into your quake3/baseq3 folder.
  3. Run quake3/start.sh (cd quake3, ./start.sh)
  4. Start fragging!

If you need a really well done tutorial on how to install it, check out the My Raspberry Pi Experience Blog

Jun 26

Super Mario Bros. Pocket Watch

Sometimes you just have to buy something nice for yourself.  I saw this watch posted on Reddit Gaming and found a couple on eBay, so I decided to get one :-D.

Hatena Block Pocket Watches

Jun 24

Neo Geo Emulation on the Raspberry Pi

UPDATE: New Raspbian Binaries Available

I’m going to start this with saying that the Neo Geo is one of my favorite systems EVER. Over the years I’ve owned multiple Neo Geo Arcade Cabinets, tons of Neo Geo boards, and a drawer full of cartridges for the system. It’s an amazing piece of hardware. The first games came out in 1989, and the system had games still coming out in 2004. There is even a homebrew scene that is still running which releases a game every couple of years.

Last week I started messing with Gngeo, an open source Neo Geo emulator. I have gotten it compiled and running. King of Fighters 98 is running at 60fps. It looks lovely. The configuration was kind of a pain, but I think I have everything working right. So without further ado, below is the guide for installing and running Gngeo on the Raspberry Pi!

  1. If you havent setup /dev/fb0 yet, just go ahead and do sudo chmod 777 /dev/fb0
  2. Download the Gngeo binaries here
  3. Download the Gngeo config file here
  4. Unzip the binaries. They should unzip to a folder called gneogeo
    1. You should have 3 folders, the ones that matter are “bin” and “roms”. Inside “roms” you need to put in a neogeo bios file as well as any legally obtained game files you have. I will not give any hints or tips on where to obtain these files.
  5. On the command line go into the bin folder (cd ~/gneogeo/bin), and type ./gngeo -i ../roms/
    1. The first time it may fail, crash, lockup your pi, or even get into a small gui looking menu. Immediately exit (this can also sometimes cause a crash).
    2. What this first run has done is create a hidden folder in your home folder called .gngeo.
  6. Go into .gngeo (cd ~/.gngeo), and copy the config file you downloaded earlier. This setups the keys and some video stuffs.
  7. Go back into the gneogeo/bin directory and run ./gngeo -i ../roms/
  8. You should now see a gui, press enter on “load game”. You should see a list of roms available to you. Press up and down to get to your desired game, then press enter to start it.
  9. Press 3 to give Player 1 a credit, 4 to give Player 2 a credit. Press 1 to start player 1, 2 to start player 2. Up down left and right control player 1, and z, x, a, and d map to the Neo Geo’s A B C and D buttons.

Press escape when done 🙂

So far I have played King of Fighters 98, Metal Slug X, and Samurai Shodown 2 at full speed with no issues 🙂

Let me know if anyone has any issues or tips.

Edit:  Here is a link to the official site of gngeo

Jun 22

Installing Django and MySQL on Mac OS X Lion

In the past 6 months I’ve had to setup Django and MySQL 4 times on our various Mac hardware at work.  I figured since I’ve seen to have it down pat now I should document it somewhere 🙂

Python should already be installed.

sudo easy_install pip

download MySQL dmg from mysql.com.  This is the version I’m using.

Mac OS X ver. 10.6 (x86, 64-bit), DMG Archive 5.5.25 111.9M
(mysql-5.5.25-osx10.6-x86_64.dmg) MD5: 081d3345daaae6f5f36a9f245855798b

sudo easy_install django

nano ~/.profile
paste this in:
export PATH=/usr/local/mysql/bin:$PATH
export DYLD_LIBRARY_PATH=”$DYLD_LIBRARY_PATH:/usr/local/mysql/lib/”

Download and install https://github.com/kennethreitz/osx-gcc-installer

sudo easy_install MySQL-python

You are ready to go 🙂


Jun 18

Wireless Keyboard Touchpad Combo

Lo all!

Last week I decided I was tired of futzing around with unplugging my mouse and keyboard from my desktop and plugging them into the Pi when I needed to test something in a local console.  SSH and VNC works for 99% of the instances out there, but sometimes, you just gotta run something on the frambuffer!

My coworker let me try out his Logitech Wireless Keyboard combo that came with a GoogleTV, and it worked really well.  The price is around $40 and if you want a decent sized keyboard, you should look at picking one up.  I decided to go for something cheaper and smaller.  The link below goes to Amazon, and it’s the keyboard mouse combo i’m using currently.  It’s great.  I recommend it.  You also get a laser pointer built in if you want to annoy your cat 🙂

Let me know if you have found any good input devices for the Pi!

Update:

Just in case anyone was curious, here is the link to the Logitech Wireless Mouse Keyboard Combo.  If you want something with larger keys, this is a great choice.